1.20.3 Attaching Primers to a Project
Please see the tutorial video below on "Attaching Saved Primers" for additional support:
Step 1: How to invoke the Attach Primers dialog
You can attach primers from Primer Libraries to existing projects by first opening the target project and then by:
Either selecting "Attach Primers" from the Primers icon in the toolbar (Figure 1.20.3.1).
Or, by selecting "Attach Primers" in the Tools drop down menu (Figure 1.20.3.2).
Or, by right clicking in a project and selecting "Attach Primers" at the bottom of the drop down menu (Figure 1.20.3.3).
 Figure 1.20.3.1: Attach Primers via the Primers icon in the toolbar.
</div>
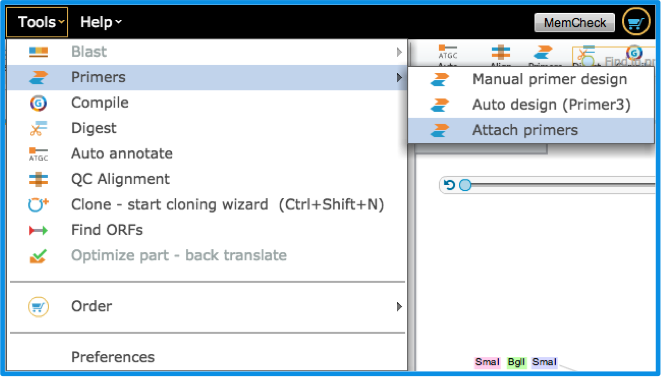 Figure 1.20.3.2: Attach Primers via the Tools Menu.
</div>
 Figure 1.20.3.3: Right click in a project to Attach Primers.
</div>
Step 2: Using the Attach Primers Dialog
- First, you can choose which Primer Libraries to search in (Figure 1.20.3.4).
- The default search will look in all primer libraries for exact matches of entire primer annealing sequences to the project sequence.
Click the "Find Primers" button if you are happy with the default search. Otherwise use the Advanced settings to refine your search.
 Figure 1.20.3.4: The Attach Primers dialog.
</div>
The Advanced settings (Figure 1.20.3.5) allow you to:
Search for a desired number of primer bases from the 3' end of the primer.
Set the amount of mismatches allowed between a sequence and the primers. The more mismatches allowed, the less strict your search will be.
Specify a search region within the project sequence according to the 3' position of the primer.
Specify a Tm range for which to search for primers.
 Figure 1.20.3.5: The Advanced settings in the Attach Primers dialog.
</div>
Step 3: Viewing Results and Choosing Primers to Attach
- After selecting the "Find primer" button the Results tab in the Attach Primers dialog will expand and list all of the primers that match the project according to your search settings.
- The primer name, strand, location, Tm, primer sequence and root library will be displayed in the table.
If you specified to detect mismatches, the mismatches will appear in the results table in the primer sequence as red bases (Figure 1.20.3.6).
 Figure 1.20.3.6: Attach Primer Results with mismatche primers detected
</div>
- Select the primers you wish to add by clicking on the checkboxes.
Click on the location in the table to preview the sequence in the project where the primer will attach to (Figure 1.20.3.7).
 Figure 1.20.3.7: Preview sequence in the project where the primer binds to
</div>
- Then select "Attach" to add them to your project. They will then be saved to the project, and you can view a summary of them in the Primer Summary Table of the project.
Attaching primers via a Primer Library
In a Primer Library there is an "Attach to Project" button at the top of the library(Figure 1.20.3.8). Clicking this will open a dialog giving you instructions on how to attach your primers via the routes explained above (Figure 1.20.3.9).
 Figure 1.20.3.8: Attach a primer to a project from the Primer Library.
</div>
 Figure 1.20.3.9: Attach a primer to a project instructions dialog.
</div>