3.1.13 Clone2Seq a.k.a Restriction Ligation Wizard
Details about this feature can be found in the main Genome Compiler user guide:
See section 1.21 for Restriction Ligation Wizard.
In Vector NTI the use of Clone2Seq was applied for two fragment restriction and ligation cloning process. This can be reached through the Clone2Seq button on the main toolbar (Figure 3.1.13.1) or File-New-Clone2Seq Project from the main menu (Figure 3.1.13.2).
 Figure 3.1.13.1: Clone2Seq button on the main toolbar in Vector NTI.
</div>
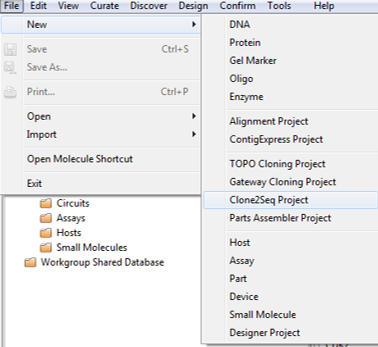 Figure 3.1.13.2: Clone2Seq from the main menu in Vector NTI.
</div>
In Genome Compiler you may use the “Restriction Ligation Wizard” which allows you to simulate the insertion of an insert either amplified by PCR or ordered as a sequence with compatible restriction sites for ligation into a destination vector, for further explanations please refer to section 1.21. In order to open the Cloning Wizard, Click the "New Construction project" icon in the main toolbar (Figure 3.1.13.3), or from the "File" menu select "New Construction Project” (Figure 3.1.13.4). Alternatively you can select the insert sequence you would like to clone, right click and choose "Clone to..." (Figure 3.1.13.5) or from the “Edit” menu select “Clone selected part“ (Figure 3.1.13.6). Another way is by opening the project containing the vector you would like to use, right click and select "Insert fragment..." from the drop down menu (Figure 3.1.13.7). The last two options will automatically add the insert sequence or the destination vector in the cloning wizard flow.
 Figure 3.1.13.3: Opening the Cloning Wizard in Genome Compiler from the "New Construction project" icon in the main toolbar.
</div>
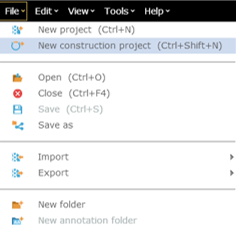 Figure 3.1.13.4: Opening the Cloning Wizard in Genome Compiler from the from the "File" menu.
</div>
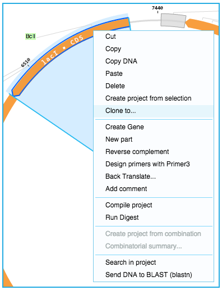 Figure 3.1.13.5: Opening the Cloning Wizard in Genome Compiler after selecting a fragment by right click.
</div>
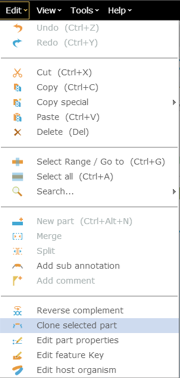 Figure 3.1.13.6: Opening the Cloning Wizard in Genome Compiler after selecting a fragment from the “Edit” menu.
</div>
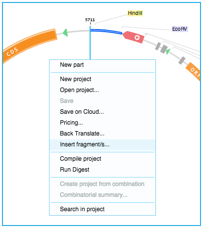 Figure 3.1.13.7: Opening the Cloning Wizard in Genome Compiler by right clicking a project.
</div>
Select “Restriction Ligation” as the Cloning Procedure (Figure 3.1.13.8).
The "In-house cloning" option is selected by default which means that you will construct the vector yourself.
 Figure 3.1.13.8: Cloning Procedure window in Genome Compiler.
</div>