3.1.10 Designer Project
Details about this feature can be found in the main Genome Compiler user guide:
See section 1.15 for Back Translation.
See section 1.16 for Combinatorial Design.
See section 1.26 for editing your feature.
See section 1.5 for standard editing tools.
In Vector NTI you can design and create a new, empty Project through : File-New-Designer Project. A new project will open which you may view and edit from the main toolbar (Figure 3.1.10.1).
 Figure 3.1.10.1: Designer Project in Vector NTI.
</div>
In Genome Compiler you may open a new project either from the main tool bar (Figure 3.1.10.2) or from the File menu-New project (Figure 3.1.10.3) or by clicking the “+” sign in the projects view and choosing “New Project” (Figure 3.1.10.4).
 Figure 3.1.10.2: Opening a new project from the main tool bar in Genome Compiler.
</div>
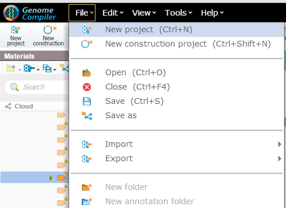 Figure 3.1.10.3: Opening a new project from File menu-New project in Genome Compiler.
</div>
 Figure 3.1.10.4: Opening a new project from the projects view in Genome Compiler.
</div>
- To insert new parts from the “Material” box, just drag and drop them to one of the views (linear/circular/sequence). This can be done in a new project or be added to an existing project. The ”Translation Settings” dialog will pop up whereby you can choose to translate your sequence according to codon usage or to a translation table or to keep the DNA as original (see section 1.15). You can further change the parts location by drag and drop as well as add part alternatives to as many different parts in the project as desired (For further combinatorial design explanation refer to section 1.16). In order to edit your feature following its addition see section 1.26.